
Converting power windows to manual offers a reliable‚ cost-effective solution for faulty systems‚ ideal for classic cars or those seeking simplicity. A feasible DIY project for enthusiasts.
Overview of the Conversion Process
The process involves removing the power window motor and regulator‚ then installing a manual crank system. Start by taking off the door panel and disconnecting electrical components. Next‚ extract the power motor assembly‚ ensuring to note the track alignment. Install the manual regulator‚ lubricate the tracks‚ and mount the window crank. Reassemble the door panel‚ ensuring proper alignment and functionality. Sourcing parts from scrapyards or aftermarket suppliers is crucial for compatibility. While the process is straightforward for classic cars‚ modern vehicles may require additional steps due to complex electronics. Proper planning and tools ensure a smooth transition to manual operation‚ offering reliability and simplicity.
Benefits of Converting to Manual Windows
Converting to manual windows offers enhanced reliability‚ eliminating the risk of electrical failures and motor burnouts. Manual systems are simpler‚ with fewer components prone to malfunction‚ reducing long-term maintenance needs. Cost savings are significant‚ as manual parts are often cheaper and more durable than power window components. Additionally‚ manual windows provide a straightforward solution for classic cars or vehicles with outdated electrical systems. The absence of complex wiring and motors also minimizes potential for corrosion or short circuits. For enthusiasts‚ manual windows offer a nostalgic‚ tactile experience and a chance to customize their vehicle. This conversion is environmentally friendly‚ as it reduces electronic waste and reliance on power-consuming systems. Overall‚ manual windows provide a practical‚ cost-effective‚ and sustainable alternative to faulty or outdated power window systems.
Common Reasons for Conversion
Many opt for manual window conversion due to recurring power window failures‚ high repair costs‚ and the desire for simplicity. Classic car owners often prefer manual systems for their reliability and nostalgic appeal. Environmental factors‚ such as extreme temperatures or exposure to dust and moisture‚ can also damage power window motors‚ making manual conversion a practical solution. Additionally‚ some drivers prefer the tactile experience of manual cranks over automatic systems. Cost savings and reduced reliance on electrical components are also significant motivators. For those seeking a straightforward‚ low-maintenance solution‚ converting to manual windows addresses these issues effectively while preserving vehicle functionality and aesthetics.
Feasibility and Considerations
Converting power windows to manual is feasible for many vehicles‚ requiring compatibility checks and assessing project complexity. It’s cost-effective but may not suit all drivers due to manual operation demands.
Assessing Your Vehicle’s Compatibility
Before converting‚ ensure your vehicle is compatible with manual windows. Check if the door structure has pre-drilled holes for manual cranks‚ as many older models do. Verify that manual regulators and cranks from similar models fit your door assembly. Inspect the window tracks and mechanisms to confirm they align with manual components. For classic cars‚ compatibility is often straightforward‚ but modern vehicles may require additional modifications. Sourcing parts from scrapyards or aftermarket suppliers can help‚ but ensure they match your vehicle’s make and model. Compatibility checks are crucial to avoid installation issues and ensure smooth operation post-conversion.
Evaluating the Complexity of the Project
Converting power windows to manual requires a moderate level of mechanical aptitude and patience. The process involves removing the door panel‚ disconnecting electrical components‚ and replacing the power window motor with a manual regulator. While the steps are manageable for DIY enthusiasts‚ challenges like aligning window tracks and ensuring proper fitment of manual parts can arise. Modern vehicles may have additional complexities due to advanced electrical systems‚ whereas older models often have simpler mechanisms. Assessing your skill level and the vehicle’s specific requirements is crucial to determine if the project is feasible without professional assistance. Proper planning and research can help mitigate potential difficulties.
Cost-Effectiveness of Manual Conversion
Converting power windows to manual can be a cost-effective solution‚ especially for older vehicles or those with recurring power window issues. Sourcing parts from scrapyards or using aftermarket kits often reduces expenses. For instance‚ manual regulators for classic cars like the BMW E36 can cost around $100‚ making it a budget-friendly option. While initial costs may seem comparable to repairing power windows‚ the long-term savings from eliminating electrical components and reducing maintenance needs make manual conversion more economical. Additionally‚ the simplicity of manual systems minimizes future repair costs‚ providing a practical and financially viable alternative for drivers seeking reliability and simplicity.
Tools and Materials Needed

Essential tools include drills‚ screwdrivers‚ wrenches‚ and rivet guns. Materials needed are manual regulators‚ window cranks‚ lubricants‚ and compatible rods for door handles‚ ensuring a smooth conversion process.

Essential Tools for the Conversion
To successfully convert power windows to manual‚ you’ll need a set of essential tools. A drill is necessary for removing rivets and drilling new holes if required. Screwdrivers‚ both Phillips and flathead‚ are crucial for disassembling door panels and electrical components. Wrenches or sockets will help remove bolts holding the power window motor in place. A rivet gun is essential for securing the new manual regulator. Pliers may come in handy for adjusting or bending parts. Lubrication tools‚ like a grease gun‚ will ensure smooth operation of the manual mechanism. Additionally‚ a torque wrench can be useful for precise bolt tightening. These tools will streamline the process and ensure a professional finish.
Parts Required for Manual Operation
Converting to manual windows requires specific parts to ensure proper functionality. The core component is a manual window regulator‚ which replaces the power motor. A window crank handle is necessary for manual operation‚ typically attaching to the regulator. Rods or linkages connect the crank to the window track‚ ensuring smooth movement. Compatibility with your vehicle’s door handle and lock mechanisms is crucial‚ as the manual system may require adjustments. Additionally‚ plastic or metal window guides may be needed to align the window properly. Sourcing these parts from scrapyards or aftermarket suppliers is common‚ ensuring they match your vehicle’s make and model for a seamless fit.
Sourcing Parts from Scrapyards or Aftermarket
Scrapyards are a cost-effective source for manual window components‚ such as cranks‚ regulators‚ and linkages‚ often available from vehicles with manual windows. Ensure compatibility by matching parts from similar models. Aftermarket suppliers also offer conversion kits tailored to specific vehicles‚ providing new or refurbished components. When sourcing‚ inspect parts for wear or damage to ensure reliability. Online forums and communities can help locate rare or model-specific parts. Additionally‚ some retailers specialize in classic car restoration‚ offering manual window kits designed for ease of installation. Always verify compatibility before purchasing‚ as incorrect parts may require additional modifications. This approach ensures a smooth and efficient conversion process.

Step-by-Step Conversion Guide
Follow detailed instructions to replace power window motors with manual regulators‚ ensuring a smooth transition. Key steps include removing panels‚ disconnecting electronics‚ and installing cranks for reliable operation.
Removing the Door Panel and Trim
Start by removing the door panel and trim to access the internal mechanisms. Use a Phillips-head screwdriver to remove screws securing the panel. Gently pry the panel away from the door frame‚ taking care not to damage the trim or electrical connectors. Disconnect any wiring harnesses connected to the panel‚ such as window switches or door locks. Once the panel is removed‚ you’ll have clear access to the power window motor and regulator assembly. This step is crucial for safely proceeding with the conversion without causing further damage to the door or its components.
Disconnecting Electrical Components
Disconnecting electrical components is a critical step in the conversion process. Start by locating the wiring harness connected to the power window motor and switches. Use a Phillips-head screwdriver to remove any screws securing the electrical connectors. Gently pull the connectors away from the motor and switches‚ ensuring no wires are damaged. If the door lock or other components share the same wiring harness‚ carefully separate the relevant wires. Label each connector to facilitate reinstallation if needed. This step prevents accidental power activation and ensures safety while working on the manual conversion. Proper disconnection is essential to avoid electrical issues or short circuits during the process.
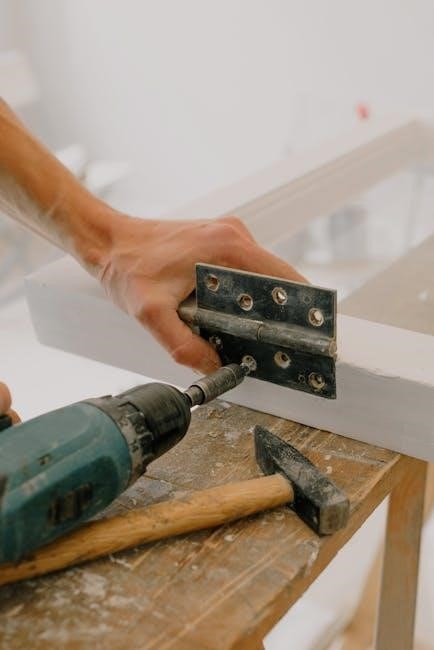
Extracting the Power Window Motor
Extracting the power window motor involves carefully removing the assembly to make way for the manual regulator. Start by drilling out the rivets that secure the motor to the door frame. Use a drill bit slightly larger than the rivet holes to ensure clean removal. Once the rivets are gone‚ gently pull the motor assembly away from the door. Note the position of the wheels on the motor—those facing the roadside typically align with the door track‚ while the others fit into the window track. Remove the entire motor assembly through the access hole where it was bolted in. This step is crucial for installing the manual mechanism and ensuring smooth operation of the new system.
Installing the Manual Regulator
Installing the manual regulator is a critical step in the conversion process. Begin by aligning the new manual regulator with the existing window tracks‚ ensuring proper fitment. Secure the regulator using the bolts provided‚ typically in the same holes where the power motor was mounted. Tighten the bolts firmly to prevent any movement. Next‚ attach the window crank to the regulator‚ making sure it is properly seated and aligned. Lubricate the tracks and wheels to ensure smooth operation. Test the crank by turning it to raise and lower the window‚ checking for any binding or misalignment. If everything moves smoothly‚ the regulator is installed correctly‚ and you can proceed to the next step in the conversion process.
Mounting the Window Crank
Mounting the window crank is a straightforward process that requires precision. Ensure the door panel is properly reassembled and the manual regulator is installed. Locate the pre-drilled hole or create one if necessary‚ aligning it with the crank’s mounting point. Secure the crank using the provided screws‚ tightening them firmly to avoid loose movement. Test the crank by turning it to ensure smooth window operation. If the crank feels misaligned‚ adjust its position before final tightening. Proper installation ensures reliable manual operation‚ restoring functionality to your windows. Always consult your vehicle’s manual for model-specific instructions to guarantee a perfect fit and operation.
Reassembling the Door Panel
Reassembling the door panel is the final step in your manual conversion process. Ensure all components‚ such as the crank and regulator‚ are securely installed before proceeding. Align the door panel with the door frame‚ making sure all clips and screws match their original positions. Gently press the panel into place‚ starting from the top and working your way down to avoid misalignment. Tighten all screws firmly with a screwdriver. Test the window crank to ensure smooth operation. Inspect the panel for any gaps or unevenness‚ adjusting as needed. Once complete‚ your manual window system should function seamlessly‚ providing a reliable and tactile experience.

Troubleshooting Common Issues
Common issues include faulty power window motors‚ corroded electrical switches‚ and misaligned window tracks. Addressing these problems ensures smooth manual operation and prevents further mechanical failures.
Identifying Faulty Power Window Motors
Faulty power window motors often exhibit sluggish or erratic operation‚ failing to move windows up or down. Noise during operation‚ such as grinding or clicking sounds‚ indicates internal wear. If a window stops responding to switches‚ the motor may be damaged. Testing the switch and circuit can isolate the issue. Replacing the motor with a manual regulator is a viable solution‚ especially for vehicles with recurring problems. Ensure compatibility when sourcing parts‚ as incorrect motors may not align with existing tracks. Proper installation and lubrication of the manual mechanism prevent future issues‚ ensuring smooth and reliable window operation.
Addressing Corrosion in Electrical Switches
Corrosion in electrical switches can disrupt power window functionality‚ causing intermittent or complete loss of operation. Inspect switches for visible rust or wear. Clean corroded terminals with an electrical cleaner and a soft brush to restore conductivity. If damage is severe‚ replace the switch entirely. Ensure all connections are secure and free from debris. Testing the window operation after cleaning or replacing the switch can confirm resolution. Regular maintenance‚ such as lubricating moving parts and inspecting electrical components‚ helps prevent future corrosion issues. Addressing these problems early avoids costly repairs and ensures reliable manual or power window performance.
Fixing Misaligned Window Tracks
Misaligned window tracks can hinder smooth operation‚ whether converting to manual or maintaining power windows. Inspect the tracks for dirt‚ debris‚ or bent components. Clean tracks thoroughly with a wire brush and lubricate with silicone spray to ensure smooth movement. If tracks are bent‚ gently straighten them or replace severely damaged sections. Adjust the window regulator’s alignment to ensure proper fit within the track. Test the window operation after adjustments to confirm alignment. Properly aligned tracks prevent wear on the regulator and ensure reliable functionality. Regular maintenance helps avoid future misalignment issues‚ keeping windows operating smoothly and efficiently.
Maintenance and Upkeep
Regular maintenance ensures smooth operation of manual windows. Lubricate moving parts‚ clean tracks‚ and inspect for wear to prevent issues. Keep your windows functioning reliably.
Lubricating the Manual Mechanism
Lubricating the manual window mechanism is essential for smooth operation. Apply silicone-based spray or white lithium grease to moving parts‚ such as gears and tracks. Regular lubrication prevents corrosion and wear‚ ensuring the crank turns effortlessly. Clean the tracks before applying grease to remove dirt and debris. Inspect the mechanism annually or whenever you notice stiffness. Proper lubrication extends the lifespan of the manual system‚ keeping your windows functioning reliably. This simple maintenance step is crucial for long-term performance and ease of use.
Cleaning the Window Tracks
Cleaning the window tracks is a crucial step in maintaining smooth manual window operation. Over time‚ dirt‚ dust‚ and debris can accumulate‚ causing friction and potential misalignment. Use a soft brush or cloth to remove loose particles. For stubborn dirt‚ mix a mild detergent with water and apply it to the tracks. Gently scrub with a soft-bristle brush to avoid scratching the surface. Rinse thoroughly with clean water and dry with a lint-free cloth. Regular cleaning prevents corrosion and ensures the window glides smoothly. Avoid using harsh chemicals or abrasive materials that could damage the tracks. Clean the tracks every 6-12 months or when you notice resistance in the window movement.
Inspecting for Wear and Tear
Regularly inspecting your manual window mechanism for wear and tear is essential to ensure smooth operation. Check the gears‚ cables‚ and tracks for signs of fraying‚ rust‚ or misalignment. Lubricate moving parts if they appear dry or stiff. Examine the window crank and its connection to the regulator for looseness or play. Inspect the door panel and tracks for dirt or debris that could interfere with the window’s movement. If you notice any worn-out components‚ such as cracked gears or frayed cables‚ replace them promptly to prevent further damage. Addressing wear and tear early can prevent costly repairs and ensure your manual windows function reliably for years to come.

Cost Comparison
Converting to manual windows can be cost-effective‚ especially for older models‚ with parts like regulators and cranks often sourced affordably from scrapyards‚ saving money compared to repeated power window repairs.
Expenses Involved in Conversion
The cost of converting power windows to manual varies depending on the vehicle and parts sourced. Manual regulators‚ window cranks‚ and door handles are typically required‚ with prices ranging from $50 to $200 per door. For older models like the BMW E36‚ a full conversion can cost around $100 using scrapyard parts. Additional expenses may include labor if professional help is needed. However‚ this is often a one-time cost‚ making it more economical than repeated power window repairs. Sourcing parts from scrapyards or aftermarket suppliers can significantly reduce expenses‚ ensuring the conversion remains budget-friendly and practical for DIY enthusiasts.
Savings Compared to Repeated Repairs
Converting power windows to manual systems offers significant long-term savings by eliminating recurring repair costs. Repeatedly replacing faulty motors‚ regulators‚ and switches can be expensive‚ with each repair potentially costing hundreds of dollars. Manual windows‚ once installed‚ require minimal maintenance and are less prone to failure‚ reducing future expenses. For example‚ a one-time conversion cost of $100 for a BMW E36 is far more economical than multiple $300 motor replacements. Additionally‚ manual systems are simpler and more durable‚ further cutting down on potential repair bills. This makes the conversion a financially savvy choice for those seeking to avoid the hassle and cost of repeated power window fixes.

DIY vs. Professional Installation
DIY conversion is feasible for those with mechanical skills‚ involving removing power components and installing manual parts. However‚ complex modern vehicles may require professional expertise for accuracy and safety.
Pros and Cons of DIY Conversion
DIY conversion offers cost savings and a sense of accomplishment for enthusiasts. It’s manageable for those with basic mechanical skills‚ requiring tools like drills and wrenches. However‚ complexity arises with modern vehicles‚ potentially involving electrical adjustments. While classic cars may be simpler‚ modern systems might demand professional expertise. Success depends on sourcing compatible parts and precise installation. Patience and attention to detail are crucial to avoid issues like misaligned tracks or faulty mechanisms. Overall‚ DIY is rewarding but requires careful planning and execution to ensure reliability and functionality.
When to Seek Professional Help
Seek professional help if your vehicle has complex electrical systems or advanced power window mechanisms. Modern cars often require specialized tools and expertise to avoid damaging sensitive components. If you’re unsure about compatibility or lack experience with automotive repairs‚ consulting a mechanic is wise. Additionally‚ if the conversion involves re wiring or custom fabrication‚ professional assistance ensures safety and reliability. DIY enthusiasts should also consider seeking help if they encounter unexpected issues‚ such as faulty switches or misaligned tracks‚ to prevent further complications. Professional intervention guarantees a seamless transition and minimizes the risk of costly errors.
Vehicle-Specific Considerations
Vehicle-specific considerations vary by make and model‚ with classic cars often being easier to convert due to fewer electronic components. Ensure compatibility by sourcing parts from similar models.

Conversion Tips for Classic Cars
Classic cars often benefit from power-to-manual window conversions due to their simpler mechanical systems. For models like the BMW E36 or older Toyota Camry‚ sourcing manual regulators from scrapyards or aftermarket suppliers is straightforward. Ensure parts compatibility by matching components from similar models. Remove the power motor and regulator‚ then install the manual assembly‚ aligning it with pre-drilled factory holes. Lubricate tracks and test operation for smooth functionality. This conversion is cost-effective and maintains reliability‚ ideal for preserving classic vehicles without modern electrical complexities. DIY enthusiasts find this project manageable with basic tools‚ enhancing their car’s nostalgic appeal while avoiding recurring power window issues.
Challenges with Modern Vehicles
Modern vehicles present unique challenges for power-to-manual window conversions due to their complex electrical systems and integrated features. Many newer models have power windows linked to central locking systems‚ touch sensors‚ and advanced controls‚ making manual conversion more intricate. The process may require disabling or rewiring these systems‚ which can be time-consuming and technically demanding. Additionally‚ modern doors often lack pre-drilled holes for manual cranks‚ necessitating modifications that may alter the vehicle’s aesthetic or functionality. While conversion is still possible‚ it often demands specialized tools and expertise‚ making it less straightforward than with classic cars. DIY enthusiasts may find it more challenging‚ potentially requiring professional assistance for a seamless outcome.
Model-Specific Conversion Guides

Model-specific guides are essential for a successful power-to-manual window conversion‚ as each vehicle’s design varies. For instance‚ the BMW E36 can be converted using manual regulators from older models‚ while the 1993 Toyota Camry requires careful removal of the power motor and installation of a manual crank. Classic cars often have simpler mechanisms‚ making the process more straightforward. Modern vehicles‚ however‚ may need additional steps due to integrated electrical systems. Sourcing parts from scrapyards or aftermarket suppliers is crucial‚ ensuring compatibility with your vehicle’s make and model. Always consult detailed diagrams or repair manuals for your specific car to avoid mismatches and ensure a smooth transition to manual operation.
Converting power windows to manual offers a reliable‚ cost-effective solution‚ ideal for classic cars or those seeking simplicity. A feasible DIY project for enthusiasts‚ ensuring long-term functionality and satisfaction.
Final Thoughts on Manual Conversion
Converting power windows to manual is a practical solution for reliability and simplicity‚ especially for classic cars. It offers cost savings‚ reduced complexity‚ and a satisfying DIY experience. Many enthusiasts find manual windows more durable and easier to maintain‚ particularly in harsh conditions. While the process requires careful planning and compatible parts‚ the end result is a system less prone to electrical failures. For those comfortable with basic tools and mechanical work‚ this conversion is a rewarding project. It not only preserves functionality but also adds a touch of nostalgia‚ making it a viable option for long-term vehicle maintenance and customization.
Encouragement for DIY Enthusiasts
DIY enthusiasts will find converting power windows to manual a rewarding project that combines hands-on learning with cost savings. The process‚ while requiring patience‚ is achievable with basic tools and mechanical aptitude. Many have successfully completed this conversion‚ proving it’s a feasible task for those willing to invest time and effort. The satisfaction of restoring functionality and simplifying your vehicle’s systems makes it a worthwhile endeavor. Plus‚ it’s an excellent way to gain deeper knowledge of your car’s mechanics. With proper planning and sourced parts‚ this project can be a fun and empowering experience‚ fostering a sense of accomplishment and connection to your vehicle.